In a previous article, we discussed the Drupal token substitution system. We looked at the power this system offers to administrators and content editors when modules allow them to put tokens in their textual content.
If you are writing your own module, you'll often want to offer this feature to your own users. In this article we'll dissect a simple example of how to go about this.
Running a substitution
Normally, tokens are relevant only for user-provided input. For the purposes of this example, we'll skip the user portion and assume we already have a string with some tokens in it.
$input = '<p>This is some text with a random number: [random:number].</p>';
Now we want to process those tokens and come up with a result string. Drupal makes this easy for us! There is a built-in token service for just this purpose. We can use dependency injection to grab it, or in a static context there is a convenience method at our disposal:
$token_service = \Drupal::token();
With the service in hand, we just need to call ->replace() on our text.
$text = $token_service->replace($input)
Then we can use the output however we need it, like in a render array:
$render['after'] = [
  '#markup' => $text,
];
And so we get the output:
- This is some text with a random number: 1890149113.
Providing context
Okay, that's great if we just want some globally-known information. But what about allowing tokens that are specific to the node we are viewing, or other situational factors? To handle these cases, we need to give some context to the ->replace() method.
Again, we'll skip the real-world bits where we would get input from the user, and just assume we have the input:
$input = '<p>A node title: [node:title]</p>';
This token won't do anything unless we specify which node we're after. So let's load one:
$node = \Drupal\node\Entity\Node::load(2);
Now we can modify our method call to supply this node, in an array keyed by the kind of info we're providing.
$text = $token_service->replace($input, [
  'node' => $node,
]);
This is enough for the token system to pass the node data on to the module providing the token, which can then perform the correct substitution.
- A node title: Lorem Ipsum
Enhancing the editor UI
We can now perform whatever token substitutions we like, which is wonderful. But how is the user supposed to know which tokens they can use?
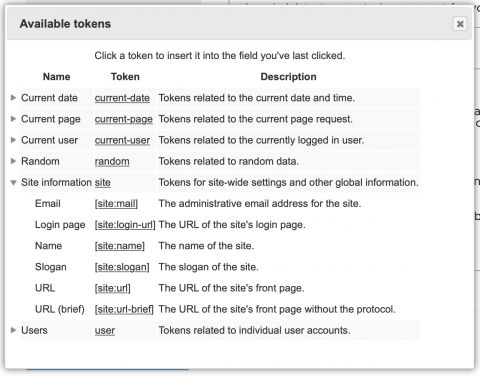
This is where the Token contributed module comes to the rescue. It provides a user interface that describes all the available tokens given the current context. It looks like this:
$render['tokens'] = [
  '#theme' => 'token_tree_link',
  '#token_types' => [
    'node',
  ],
];
The #token_types property is necessary to tell the module which contextual information is being provided, and therefore which non-global tokens to display in the resulting dialog.

Caching considerations
Tokens may pull data from any number of sources, and so it's important to tell the Drupal render system which tokens were used. This lets the render cache get rebuilt whenever those data sources have changed.
To get the caching metadata from the token providers and add it to your render array, you can use a plain BubbleableMetadata object, like so:
$bubbleable_metadata = new \Drupal\Core\Render\BubbleableMetadata();

$node = \Drupal\node\Entity\Node::load(2);
$text = $token_service->replace($input, [
  'node' => $node,
], [], $bubbleable_metadata);

$render['after'] = [
  '#markup' => $text,
];

$bubbleable_metadata->applyTo($render);
The other advantage of doing this is that you get to say "bubbleable," which is a fun word.
Next steps
Now we can process any user-entered text and allow tokens can be substituted, optionally including relevant contextual data. To round out our toolkit, in the next article we'll learn how to provide our own, new tokens as well.
Need a fresh perspective on a tough project?
Let’s talk about how RDG can help.
