From form submission confirmation messages to password recovery requests, system emails are an important part of any website or application. The design of these emails is therefore an important touchpoint that should not be forgotten about. In this tutorial, I’ll explain step-by-step the process to enable and style custom HTML emails in Drupal 8.
1. Enable modules
There are many different modules out there, I’ve had the most success with the combination of these three modules: Mail System, Mime Mail, and SMTP.
2. Configure modules
Mail System
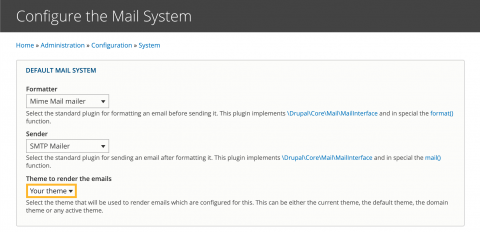
Once your modules are installed and enabled, head over to the Mail System configuration page (Configuration > System > Mail System). Here, you’ll set your mail formatter and sender. We’ve seen the best results with the combination of using Mime Mail mailer as the Formatter and SMTP Mailer as the Sender. Finally, set the theme to render the emails to your active theme. You can skip module-specific configuration unless you find that you need it for your specific use case.

Mime Mail
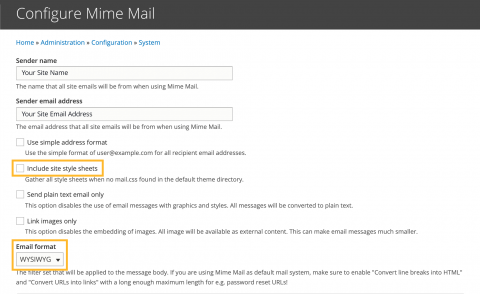
Now you’ll configure Mime Mail (Configuration > System > Mime Mail). All you really need to do here is select your email text format. If you’re not using a mail.css file, you may also consider unchecking “Include site style sheets” to avoid including too many unnecessary styles.

3. Create/modify base email templates
By using the Mime Mail formatter, we have access to a template named mimemail-message.html.twig that we can override in our theme. This template will be used by all account-related emails sent from the system, like account creation and password recovery. For emails sent via the Webform module, the template you’ll need is webform-email-html.html.twig. Other modules may have their own email templates as well, so be sure to check all email messages sent by your site!
4. Apply styles
Now that we have our email templates, we can begin applying styles to these emails. By default, Mime Mail will look for a mail.css file in your theme and will include it in your email template. Mime Mail should also automatically handle converting stylesheets to inline style attributes before sending the email, but you could also inline your styles manually if necessary. By default, Webform does not include any stylesheets in emails sent by the module, so if you’ll have to manually add your styles to the webform template file as well.
5. Test, test, test!
Email clients are notoriously finicky when it comes to displaying emails. An email may appear perfectly in Apple Mail but broken in Gmail and Outlook. That's why it's extremely important to test each email before sending them to real users. You can perform manual tests by signing up for a few different email providers and using each to view emails sent by your site.
You can also try sending a test email to multiple email addresses at once (I have asked fellow colleagues and even family members to help give me a diverse set of email clients) using a free service like Putsmail. If you’re interested in a paid service, Litmus will generate screenshots of your email in different popular email clients, so you can test everything at once.
Need a fresh perspective on a tough project?
Let’s talk about how RDG can help.
